

Optic Mounts
Beamsplitters, Mirrors, and Lenses
The homemade optic mount shown in Figure 11a can be used to mount your linear-gradient variable beamsplitter, small directional mirrors, and diverging lenses or microscope objectives (Figures 4b, 5, and 6a & 6c respectively). If you purchase a circular-gradient variable beamsplitter, a table mount will come with it or you can purchase one for it. Figure 11b shows the individual parts before painting.
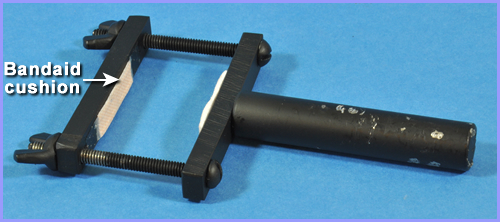
Figure 11a: Optic mount.

Figure 11b: Optic mount parts.
- Two pieces of Plexiglas are used to sandwich the optical component between them using two bolts with wing nuts.
- The two Plexiglas pieces are 3 inch long x 1/2 inch wide x 1/4 inch thick , with holes drilled in each end to accommodate 8-32 bolts with a spacing between the bolts of 2 inches . Use a 5/32 inch bit to drill these holes.
- Next, in one of the pieces of Plexiglas, halfway along its length and centered, drill a hole completely through the Plexiglas using a 1/8 inch bit and tap an 8-32 thread for accommodating a short rod with an 8-32 bolt. A short rod (Figure 9), with an 8-32 bolt, is screwed into this hole and then the short rod is connected to a table mount using a connector (Figure 8).
- Spray paint the two pieces of Plexiglas, the 8-32 bolts, and the wing nuts with enamel flat black paint and allow to dry thoroughly before assembling the optic mount.
- When screwing in the short rod, make sure it is tightly secured.
- Additionally, the 8-32 bolt on the end of the short rod should not protrude above the surface of the Plexiglas piece in the area under the band aid cushion. This would interfere with the optical component resting snuggly against the cushion.
To cushion the clamping force of the two pieces of Plexiglas tightened by the bolts and wing nuts, I use cut pieces of band aids. The cotton provides the cushion and the adhesive side helps attached them to the Plexiglas. Another great cushion material is the soft portion of Velcro. I've found that the cotton portion of the band aid has a tendency to produce fibers that stick out and can interfere with the beam. Velcro does not have this problem.
For directional mirrors larger than mentioned above, the optic mount in Figure 11a does not work well. You will have occasions to use one or more 4 inch x 5 inch x 1/4 inch thick or 5 inch x 7 inch x 1/4 inch thick directional mirrors. Figures 11c & 11d show a mounting technique you can use for mirrors of this size using Plexiglas. The mirror shown in both Figures is 4 inches x 5 inches x 1/4 inch thick . The Plexiglas mount is slightly less in size than the mirror itself although the mount could be the same size or a bit larger than the mirror size. Figure 11e shows the Plexiglas mount cut to size and unpainted.

Figure 11c: Large front surface mirror mount showing front surface facing up.
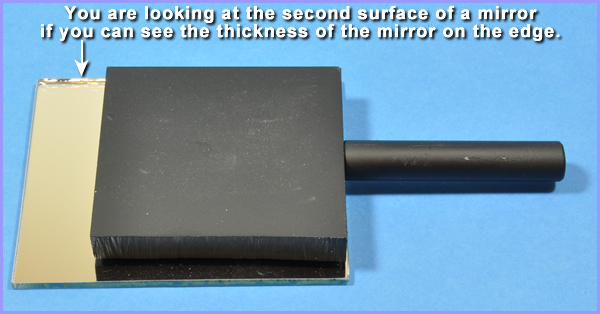
Figure 11d: Large front surface mirror mount showing back side of mirror.
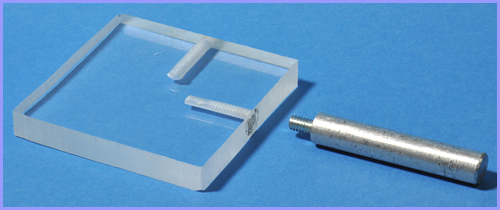
Figure 11e: Large mirror mount cut to size, tapped, and unpainted.
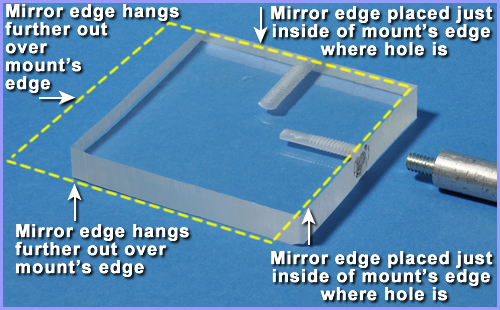
Figure 11f: Important large mirror placement on Plexiglas mount.
Drill and tap a hole half way along and centered on one 4 inch side and do the same on one 5 inch side to accommodate a short rod with a 1/4-20 bolt as shown in Figure 11e. Use a 3/16 inch drill bit and drill the hole 1 inch deep. You need this larger bolt size, instead of the 8-32 bolt size, to give better stability for the larger sized mirror and mount. Why two holes for the short rod? If you're setting up your plate holder with the 5 inch side of the holder orientated vertically for recording a vertically orientated figurine, for example, you will want to orientate the 5 inch side of the mirror vertically to get adequate light coverage of the plate. The two tapped holes let you reposition the short rod, and therefore the orientation of the mirror, to accommodate the orientation of your plate holder.
Spray paint the Plexiglas mount with enamel flat black paint and allow to dry thoroughly. Attach the short rod to the mount tightly. Next, epoxy the mirror to the Plexiglas surface making sure the reflective first surface of the mirror is facing away from the mount as shown in Figures 11b & 11c. The mirror, mount, and short rod are then attached to a table mount using a connector.
If down the road you plan to make 8 inch x 10 inch holograms or larger, the optic mounts for 8 inch x 10 inch x 1/2 inch thick mirrors and larger require their own special design. If you contact me, I'll be happy to send the designs for these types of optic mounts.
Laser
The laser needs two table mounts as shown in Figure 12. The table mount poles are connected together with a 1/2 inch diameter solid aluminum pole running between them and connected to each table mount pole. The length of the connecting pole will be determined by the width of your laser. The laser sits between the two mounts. At the center of the connecting pole is another connector that has a short rod with a 1/4-20 bolt. This short rod with the bolt screws into a 1/4-20 hole in the bottom of the laser housing. Most small He-Ne lasers are supplied with this 1/4-20 hole. Using this mounting technique allows you to easily adjust the height of the laser on the optical table and allows you to tilt the front of the laser up and down.
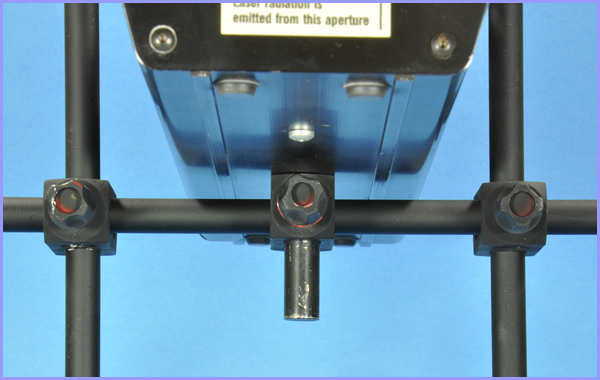
Figure 12: Table mounts for the laser.
Spatial Filter
If you plan to use a spatial filter, you will need to mount the base of the spatial filter to a 3 inch x 2 inch x 1/2 inch thick piece of Plexiglas as shown in Figure 13a. Once you've cut your Plexiglas mount, lay the spatial filter's base on top of it. The spatial filter base has three holes drilled in it to accommodate 1/4-20 bolts, but you will just be using the front two holes.

Figure 13a: Mount for the spatial filter.
- Referring to Figure 13a again, hold the spatial filter base firmly down on the Plexiglas mount, stick a pencil, pen, or marker into the two front holes and place marks on the Plexiglas mount for drilling holes and tapping.
- Remove the spatial filter from the mount.
- Using a 3/16 inch bit, drill holes perpendicular through the Plexiglas mount where you marked them and then use a 1/4-20 tap to create threads.
- Next, on the 3 inch side of the Plexiglas mount furthest away from the Plexiglas drilled holes, use a 3/16 inch bit and drill a 1.0 inch deep hole half way along that 3 inch side and centered.
- Using a 1/4-20 tap, create threads for attaching a short rod with a 1/4-20 bolt.
Before you assemble the Plexiglas mount, spatial filter base, and short rod, paint the Plexiglas mount with enamel flat black paint and allow to dry. Now assemble the parts by bolting the spatial filter base to the Plexiglas mount with 1/4-20 bolts and then screw the short rod into the Plexiglas mount tightly as shown in Figure 13b. The completed unit is then attached to a table mount using a connector.
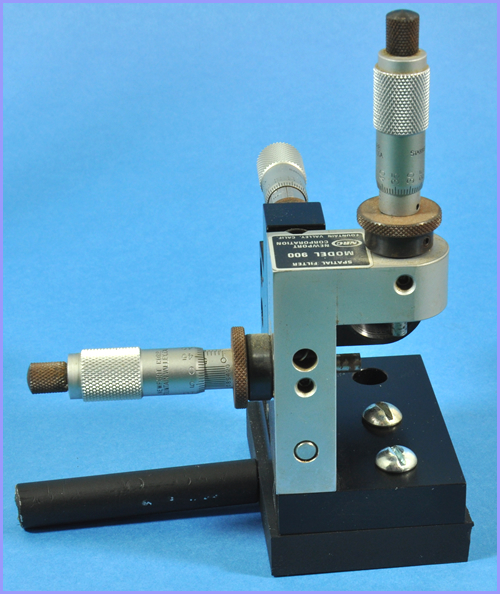
Figure 13b: Spatial filter assembled with mount and short rod.
Parabolic Mirror
In order to mount the parabolic mirror, you should purchase the telescope mirror mount made for this size mirror as shown in Figure 14. Two holes are drilled, opposite one another, in the mirror mount for 1/4-20 bolts using a 1/4 inch bit. A short rod with a 1/4-20 bolt is attached to each of the two holes in the mount with 1/4-20 nuts and lock washers. Two table mounts, each with a connector, are attached to the short rods, one on each side of the mount.
I recommend placing and tightening the parabolic mirror in its mount before you attach the telescope mirror mount to the table mounts. You may need someone to help you attach the telescope mirror mount to the table mounts because of its weight. Be very careful not to accidentally scratch the front surface of the mirror. You do not have to paint the telescope mirror mount flat black, but the short rods and table mount poles should be painted with enamel flat black paint.
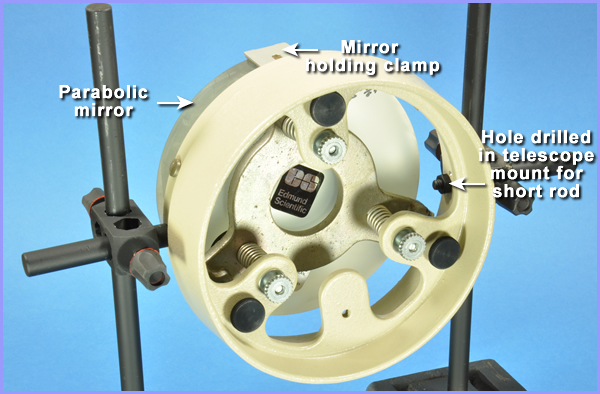
Figure 14: Parabolic mirror telescope mount.
Home | Introduction | Overview | Optical Table | Environment | Laser | Beamsplitter |
Mirrors ⁄ Lenses | Table Mounts | Optic Mounts | Plate Holder | Objects ⁄ Scenes | Hard Copy | Resources
Home | Introduction | Vibrations | Processing | SB Transmission | Exposure |
Recording | SB Reflection | MB Transmission | MB Reflection | Lighting | Hardcopy | Resources